If you're making a pumpkin pie or just carving one for a Jack-o'-lantern, do not throw away the pumpkin seeds. Roasted pumpkin seeds can be a delicious as well as a healthy snack which you can munch on after you have your pumpkin pie dessert. So here's a quick and easy guide on how to roast pumpkin seeds.
You will need:
pumpkin seeds
oven
baking sheet
oven mitten
salt
1-2 tbsp olive oil or melted butter
bowl
spoon
Procedure:
Step 1: Wash your seeds.
Rinse off your pumpkin seeds and pat them dry with a paper towel.
Step 2: Preheat the oven.
Preheat the oven to 350ºF.
Step 3: Add oil and stir.
Stir the seeds into a bowl with olive oil or butter.
Step 4: Baking sheet and salt
Pour the seeds flat into the baking sheet and sprinkle with salt.
Step 5: Bake and check.
Bake the pumpkin seeds for 30-40 minutes or until brown.
Don't forget to check the seeds every 10 minutes.
Let the seeds cool for 5 to 10 minutes before eating.
Another pumpkin pie recipe. This is really yummy. But, I just wonder if I could use squash instead of pumpkin, because in my hometown, I don't see pumpkins around. Here's how to make pumpkin pie.
Ingredients:
850 g /30 oz pumpkin, chopped
350 ml /12.3 fl oz cream
190 g / 6.7 oz brown sugar
1/2 tsp salt
3 eggs and 1 egg yolk
1 tsp cinnamon
1/4 or quarter tsp nutmeg
1/4 or quarter tsp allspice
zest of 1 lemon
short-crust pastry base, ready made
about 500g /17.6 oz of beans to weigh down the crust
Utensils needed:
roasting tin
spoon
fork
pie mould
jug
hand blender
aluminum foil
parchment paper
Watch the video:
Cooking procedure:
Step 1:
Preheat the oven: Set the temperature to 180ºC or gas mark 4.
Step 2:
Roast the pumpkin: Tip the chopped pumpkin into the roasting tin and cover it tightly with aluminium foil. Put the tin on a low shelf in the oven and bake for about 30 minutes (this is the first stage of creating the pumpkin puree).
Step 3:
Prepare the pastry base: Gently lay the pastry crust on the pie mold and carefully press it down to form the shape of the pie. Remove any excess pastry from the edges. Now using a fork, lightly jab the bottom of the base various times. This will prevent the pastry from rising.
Put the parchment paper over the top of the pastry and pour the beans on top to weigh it down.
Step 4:
Bake the pastry: Place the pie mold in the oven with the pumpkin and bake for 20 minutes.
Step 5:
Remove from the oven: When the pastry crust is golden brown, take it out of the oven. Test the pumpkin to see if it's done by piercing it with a fork. It needs to be completely soft to make the puree. Remove it from the oven and discard the foil. Take the beans off the pastry and leave it and the pumpkin to cool.
Finally, raise the temperature of the oven to 210 degrees centigrade or gas mark 6.
Step 6:
Make the pumpkin puree: Spoon the cooked pumpkin into the jug and using the hand blender, blend into a puree.
Step 7:
Prepare the pie filling: In a large bowl mix the brown sugar, cinnamon, nutmeg, allspice, lemon zest and salt. Now, whisk the eggs, add them to the other ingredients and stir. Pour in the pumpkin puree and cream and stir well.
Step 8:
Bake: Pour the filling into the pastry crust, almost to the top. Carefully place it into the centre of the oven and bake for 15 minutes. Lower the temperature to 160ºC and bake for a further 35 minutes.
Step 9:
Remove from the oven: When the pie is fully cooked remove it from the oven and allow it to cool and set.
Step 10:
Serve: The pie can be eaten warm or cold and served dusted with icing sugar and with a dollop of whipped cream.
You probably take pumpkin pie from canned pumpkin for granted. You're there, the can is there, there's a pumpkin on the label... open it and mix it up with spices to make a pie, right? Ah, but a pumpkin pie made from a fresh pumpkin tastes so much better. Pumpkin pie is just one of the traditional Halloween food craved for every month of October, and making it homemade makes it more delightful to serve. Here's a recipe on how to make homemade pumpkin pie or specifically how to make homemade pumpkin pie from scratch.
The cooking procedure is quite lengthy and the video is slow. But still the quality of the output is worth your while. Watch the full video from Youtube by April Bailey.
Ingredients: (per pie)
2 cups cooked pumpkin
3 eggs
1 cup light cream
3/4 cup sugar
2 tsp cinnamon
1/2 tsp nutmeg
1/3 tsp cloves
1/2 tsp salt
1 deep dish pie shell
Cooking video:
Cooking procedure:
Set I. Preparing the pumpkin.
Start with two pumpkins, about 3 lbs each.
Thoroughly wash the outside of each.
With a large sharp knife, split each pumpkin down the middle.
Using a large spoon, scoop out all of the seeds and pith of the pumpkin. Do not scrape too far into the flesh of the pumpkin.
Place the halves of the pumpkin on a cookie sheet lined with foil so that the skin side is facing up.
Place pumpkin halves into a 350 degree oven for approximately 30 minutes.
After 30 minutes, rotate cookie sheets from one shelf to another to allow even cooking.
Cook for an additional 30 minutes. A butter knife should be able to be inserted through the skin with no effort at all.
Leave pumpkin halves on cookie tray and allow to cool part way - approximately 20 minutes.
Once partially cooled, place pumpkin half on a cutting board and begin to scoop out all of the flesh. (You will see dark spots around the rim of the pumpkin. This is OKAY! It's the sugar that have caramelized. be sure to include!)
Place the flesh into a bowl and allow to cool further. There will be a lot of juice which needs to be kept in the bowl.
While the pumpkin cools, prepare your cheese cloth and colander set-up. Cut cheese cloth into strips of approximately 18 inches.
Place a large colander into a pot or deep bowl.
Open each cheesecloth strip to its full spread, then refold it in half to form a double-layered sheet. Place over the colander.
Place the second cheesecloth sheet over the first but with the corners positioned in-between those of the first sheet.
Take the cooled pumpkin and place spoonfuls into a blender until it's filled about 2/3 full. (NOTE: DO NOT use HOT pumpkin - it will explode from the pressure of the blender!)
Set the blender to puree or blend until the pumpkin looks like baby food.
Pour pumpkin puree into cheesecloth that has been placed over colander.
Find the opposite corners of the top-most layer of cheesecloth and tie them in a knot pulling as tightly as possible.
If pumpkin squeezes out the other part, that's okay. Take the opposite corners and tie them over the first knot.
Now, take two opposite corners of the bottom layer of cheesecloth and repeat the process. Take the final two corners and tie. (You will probably have some pumpkin that had escaped the cheesecloth at this point. Don't worry!)
Remove the pumpkin, put one more layer of cheesecloth (folded as before) in the colander and flip the ball in knot-side down.
Again, tie off the corners as before, pulling as tightly as you can.
Juice should be running down the colander by now. Pour this out then place heavy plates on top to press down more.
Let the pumpkin sit and drain in the refrigerator for at least 8 hours.
After several hours of draining and pressing, the pumpkin should look something like a tight ball in the cheesecloth.
Carefully cut the cheesecloth near the knots and remove the pumpkin.
Set II. Preparing the other ingredients.
Set out your other ingredients.
Gently beat the eggs and mix with cream in one bowl.
Pour all the dry ingredients together in another bowl and thoroughly mix.
Add the combined dry ingredients to the pumpkin and mix thoroughly. (The pumpkin should take on a nice dark color when the ingredients are all incorporated.)
Begin adding the cream mixture to the pumpkin mix. Do this in small amounts (about 1/2 cup) at a time.
The pumpkin will begin to loosen as you add more of the cream mixture. (After adding all the cream mixture, the pumpkin will take on a silky appearance. Perfect!)
Place two deep dish pie crusts on a foil-lined baking sheet. Set your oven to 400 degrees F. (If you use frozen pie shells, DO NOT precook them.)
With a ladle, carefully begin placing pumpkin mixture into each pie shell.
Fill each shell as close to the top as possible and use the ladle to even out any high spots.
Carefully place pies in oven on middle rack and bake until a butter knife inserted in the middle comes out clean (40-45 minutes).
Remove pies from oven and place on a cooling rack.
Cassava cake is just one of the many Filipino desserts I really crave. I bought cassava cake the other day from ESMA Bakeshop. It's really yummy especially with those grated cheese on top. A small slice costs Php 10.00. The cassava cake is perfect for any occasion as dessert. Instead of buying from bakeshop, I thought of doing it myself at home, following the simple cassava cake recipe. Here's how to make cassava cake:
Ingredients:
Batter:
2 packs grated cassava (about 2 lbs total weight) 1 can coconut milk ½ can evaporated milk 2 pieces raw egg ¼ cup butter, melted 6 tbsp cheese, grated ½ cup condensed milk 14 tbsp sugar
Topping:
1 can coconut milk 2 tbsp sugar ½ cup condensed milk 2 tbsp flour 2 tbsp cheese, grated 1 piece raw egg
Cooking procedure:
Preparing the batter:
Combine the grated cassava, butter, condensed milk, evaporated milk, cheese, sugar, and eggs in a mixing bowl and mix thoroughly
Add the coconut milk in the mixing bowl where the mixed ingredients are. Mix again.
Grease the baking tray then pour-in the batter (ingredients that has just been mixed)
Preheat oven for 350 degrees Fahrenheit for 10 minutes then put-in the baking tray with batter and bake for 1 hour.
Preparing the Topping:
Combine the sugar and flour and put-in the heated saucepan.
Pour-in the condensed milk then mix thoroughly.
Add the cheese while stirring constantly.
Pour the coconut milk and stir constantly for 10 minutes
Pour the topping over the Cassava Cake (baked batter) and spread evenly.
Separate the yolk from the egg white of the remaining egg (we’ll be needing the egg white)
Glaze the topping with the egg white (you may use a basting brush for this step)
Broil the Cassava cake until color turns light brown.
Garnish with grated cheese and serve. Share and enjoy!
I first saw morcon when I was in Manila having a Christmas nochue buena at my employer's house. I think beef morcon is one of the traditional holiday specialties of the Tagalogs. A morcon is a rolled beef with various ingredients inside. Actually, I haven't tasted it although it was just in front of me because I was focusing my attention on the home-made embutido which I prefer more because it's made of pork. But my sister said, the morcon was really really yummy.
Here's how to make beef morcon:
Morcon Ingredients:
1 kilo beef, sliced 1/4 inch thick (3 pcs.)
200 grams sliced sausages
200 grams pork fat (sliced into thin strips)
3 hard boiled eggs, sliced
100 grams cheddar cheese in strips
9 pcs whole sweet pickles
1 can tomato sauce
2 onions, chopped
5 bay leaf (laurel)
1/2 teaspoon of ground black pepper
2 teaspoon salt
2 cups of water
2 meters thread or string (for tying)
For beef marinade:
soy sauce
lemon
Beef Morcon Cooking Instructions:
Butterfly the beef.
Marinate the beef in soy sauce and lemon.
Prepare the rest of the ingredients.
Spread and stretch the sliced beef on your working table.
Lay out the ingredients on the beef: sausage strips, cheese strips, sliced eggs, pork fat and some ground liver.
Gently roll the sliced beef with all the filling inside and secure with a thread or string.
Repeat the procedure for the two remaining beef slices.
Saute some bacon fat for added flavor.
Lightly dredge the rolled beef in flour.
Fry the beef brown on all sides.
Add a can of tomato sauce.
Add tomato sauce, water and spices.
Simmer until beef softens.
Remove the strings.
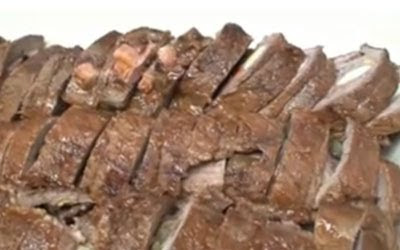
Cut the beef about an inch thick.
Serve and Enjoy!
___________________________________
Here's another How To Make Beef Morcon:
Estimated cooking time: 2 to 3 hours.
Morcon Ingredients:
1 kilo beef, sliced 1/4 inch thick (3 pcs.)
1/4 kilo ground beef liver
200 grams sliced sausages or ham
200 grams pork fat (cut is strips)
3 hard boiled eggs, sliced
100 grams cheddar cheese in strips
100 grams grated cheddar cheese
2 onions, chopped
5 bay leaf (laurel)
1/2 teaspoon of ground black pepper
1/2 cup vinegar
2 teaspoon salt
2 cups of water
2 meters thread or string (for tying)
Beef Morcon Cooking Instructions:
Spread and stretch the sliced beef on your working table.
Arrange the filling on the sliced beef: sausage strips, cheese strips, sliced eggs, pork fat and some ground liver.
Roll the sliced beef with all the filling inside and secure with a thread or string.
Repeat the procedure for the two remaining beef slices.
On a pot, place the beef rolls and put the water, the remaining ground liver, grated cheese, chopped onions, bay leaves, ground black pepper and salt.
Cover the pot and bring to a boil. Simmer for one hour.
Add the vinegar and continue to simmer of another hour or until beef is tender.
Slice the beef morcon, arrange on a platter and top with the sauce/ gravy poured on top.
Cooking Tips:
A spoon or two of flour can be added to water to thicken the sauce.
Instead of boiling in a pot, you can use a pressure cooker for faster cooking.
I like meatloaf very much. In fact, I'm a meat-diet fan.
There are many kinds of meatloaf-chicken, pork, turkey, beef, and even Filipino-style meatloaf (embutido). Check out this how to make Filipino-style Embutido, perfect for Christmas noche buena.
Meatloaf is said to be a food for tough economic times. Here, Chef Stephen Gibbs shows us how to make a meatloaf.
Ingredients:
2 lbs ground pork
2 lbs ground beef
2 eggs, lightly beaten
1 1/2 cup panco bread crumbs
1 yello onion, finely chopped and sautéed
4 cloves garlic, minced and sautéed
1 tsp. smoked paprika
1/2 tsp. cayenne pepper
2 squirts Worcestershire sauce
1 tbs. salt
1 tsp. black pepper
Procedure: (Watch the video)
Mix all ingredients together and form a loaf on a parchment paper lined sheet pan.